Archives for category: Healthy Recipes

I love veggies, I love salads…but sometimes you just get sick of the same ole, same ole. Right? Sometimes you just have to change things up a bit. You get sick of lettuce or spinach, heck even my favorite of eating Kale gets old. Eating healthy is the first thing to go if you don’t allow for variety and who wants to slave over a hot oven when it’s hot out. Um, not me thank you very much! So, if you are looking for that perfect healthy side with variety built-in, look no further.

I came across a bazillion recipes with their own recipes and they all seemed to be missing something. One I was even not totally sold on. Thinking, hmm…I don’t know. However I just took the plunge and went for it and added my own twist as always. Healthy, Light and Quite tasteful!

Green Bean Salad with Lemon Vinaigrette

Click Here for Printable Version: Green Bean Salad with Lemon Vinaigrette

The Goal and Key behind the success of this entire recipe – The perfectly steamed bean! 

Serves about 7-8 people or as we say more for leftovers the next day! 🙂

  • Approximately 1.5 to 2 lbs Lightly Steamed Green Beans Trimmed and kept long
  • 1 Cucumber cut into long strips about the size of the beans. Don’t use seeded part of the cucumber. Just trim the cucumber from end to end all the way around until you hit the seeded part and discard. Cut in very thin slices.
  • 1 red pepper cut into long thing strips
  • 1/2 red onion into thin strips
  • 12 cherry tomatoes halved or quartered depending on size.
  • 1/3 cup of light feta cheese
  • 1/2 cup walnuts lightly chopped

Lemon Vinaigrette Dressing

  • 2-3 cloves of freshly pressed garlic
  • 1 juice from a lemon
  • 1/2 cup of EVOO
  • 1 small shallot or 1/2 large shallot finely chopped
  • 2 Tablespoon of dried parsley or better yet 1 Tablespoon of fresh if you have on hand.
  • salt and pepper to taste.

Bring a large stock pan with about 3/4 filled with water to boil. Set aside a bowl of ice-cold water with plenty of ice for beans after they have been blanched to cool off and prevent further cooking. You could also use a vegetable steamer for this as well. I just find it easier to check them as I visually see them boiling.

Chop veggies.

Lightly salt water and place beans in with pan on high uncovered. Set timer for 3 minutes. At 3 minutes, test one. If it’s still crunchy, continue to check minute by minute. You want it al dente basically. Just past the crunchy point, chewy but not soggy or limp. As soon as you start to see a very fain green in the water they are either done or very close to done. Mine took about 5 or 6 minutes to get to this point. Immediately remove and place in ice bath. Stir them around to ensure beans get mixed and cooled off. Set side.

Make vinaigrette.

Drain beans. Place everything in a bowl.  Lightly season with salt and pepper. Mix it up well by hand. Cover with Saran wrap and place in fridge. Let everything meld and sit in fridge for at least an hour or even two if you can.

Vegan Suggestions:

Eliminate feta for vegan alternative, perhaps something crumbly and/or salty like a tempeh or tofu and nutritional yeast mixed or cheese alternative. Not sure if they have a vegan feta.

Raw Vegan Version:

Skip steaming of beans and mix and prepare salad. Let marinade a good 3-4 hours or possibly over night.

I received complements from 3 of my family members who really aren’t into eating veggies and even they were impressed. I have always said that how you prepare your veggies determines their fate. If you over cook them, under cook them, don’t season them with flavor or you use frozen instead of fresh, the average person is likely to not enjoy them. It’s a little bit of everything, especially if you are a virgin veggie eater. 🙂 You need to be fully convinced of their truest potential. This recipe definitely incorporates all of the above. Fresh, perfectly cooked and seasoned with a whole orchestra of flavor. Most importantly, preserving as much of the nutrient content in the bean as possible.

Happy Foodie Friday!

-J

P.S. I should have a photo for you sometime tomorrow evening included in the post and the printable format if you would like to print one out or you can print it out now without.

-J


Happy Foodie Friday Everyone! –

I don’t know about you all but pancakes are a staple in this house! My husband makes them on the weekend, thus the name weekend oat-cakes 🙂 and we all love them, especially the little lady! You can always make them any day of the week though. I sometimes freeze them in batches for busy days and weekends when we are in the mood for them but don’t always have time to whip up a batch.

Traditionally, they are made with white flour, oil and white sugar – neither of which is all that nutritious. Not to mention anything white like flour and sugar is over processed and void of any nutritional value with added chemicals. Wheat isn’t feasible for people with gluten sensitivity and super high on the allergen list in general. Overall, not really beneficial to any of us, much less a growing child. You can swap this recipe out with whole ground wheat flour but I find a lot of people don’t care for the harsh taste and because of that I’m not a fan of using it in pancakes, plus it’s pricier.

Over the years, I started figuring out ways to get more bang for my calorie = more nutrition, less sugar, more whole grains, etc. After experimenting a little, trying whole wheat, buckwheat and quinoa, in the end I chose oat flour. It’s cheap and readily available.  It took these pancakes to a whole new level. I will never go back!  All you have to do is buy bulk oats and mill them yourself. Way cheaper than buying it pre-packaged! It gives it a nice, nutty like flavor. Trust me. 🙂

I believe food should be nutritious AND taste yummy too! You shouldn’t have to settle for one or the other.

Don’t forget to check out the Healthy Foodie Swap Outs after the recipe for more great ideas!

oat pancakes

Weekend Oat-Cakes (Pancakes)

Makes about 12-15 silver dollar size cakes

  • 3 cups of ground oat flour
  • 2/3 tablespoon of stevia (not liquid drops although you can use those too.) Original recipe calls for 2 Tablespoon of sugar.
  • 2 teaspoon of baking powder.
  • 1/2 teaspoon of baking soda
  • 1/2 teaspoon of salt
  • 2 beaten eggs
  • 2 – 2.5 cups of almond, coconut or milk of choice or you can also .
  • 1/4 cup of unsweetened applesauce
  • 3 Tablespoons of ground flaxseed

Optional: replace eggs with ground flax-seed.  1 Tablespoon of water to 3 Tablespoons of ground flax-seed per egg. Be sure to let sit for 15 min to thicken and you may want to reduce liquid to half. It gets a bit gummy in texture. Sometimes I test cook one before adding more liquid. Just omit the original optional 3 Tablespoons of ground flax included in the recipe.

 * I use coconut oil for lightly coating the pan. I don’t care for the cooking sprays as they contain silicone. 😦 I do have a pump bottle that I use though, which I highly recommend.

Just throw it all together in a bowl and mix. I usually use a 1/4 cup measuring cup to dispense batter into pan.

Cook first side on medium heat until top it has bubbles than flip.

NOTE: It’s important to keep any leftover seeds like flax, chia and pumpkin that are ground, refrigerated in a airtight container to maintain healthy oils and nutrients. Additionally, especially with smaller seeds like flax, they need to be ground as our digestive system can’t break them down and you won’t benefit from their goodness. Even if you are adding them to a smoothie. The average blender will not break them down.

—————————————————————————————————————————————————————————–

HEALTHY FOODIE SWAP OUTS

INSTEAD OF EGGS : USE FLAX SEED. 1 Tablespoon of Ground Flax to 3 Tablespoons of Water.

INSTEAD OF OIL: USE EQUAL PARTS APPLESAUCE

INSTEAD OF SUGAR, TRY STEVIA OR XYLITOL. See instructions for conversion for sugar recipes.

INSTEAD OF SOUR CREAM, USE NON-FAT GREEK YOGURT

INSTEAD OF RICE, USE CAULIFLOWER ( Just pulse a few times in the food processor until  size/texture resembles that of rice. Be sure to pat dry before hand.) Saute in a little EVOO.

INSTEAD OF SPAGHETTI/PASTA, USE SPAGHETTI SQUASH.

Hope some of these are helpful and enjoy the oatcake recipe.

Have a blessed weekend.

– J


Happy Friday Everyone!

I have officially deemed Friday posts dedicated to all things good in the world, FOOD! 🙂

Each Friday I plan on posting a yummy and healthy recipe to share with you. I know that being a busy momma who’s trying to feed a growing and sometimes picky toddler, along with trying to eat healthy can be quite the challenge. So, as I find recipes that are a success, I’d figure I’d go ahead and put them up for you to try if you choose.

Overall this recipe is pretty healthy and you can watch your fat by simply reducing or eliminating your cheese and using a low-fat or fat free version and being very frugal with your EVOO. In short everything is customizable to your needs.

Now let me premise, you don’t have to be a vegan to eat this and if you are vegan you can just substitute for the cheese portions.

So, without further adieu…

Today’s Recipe:

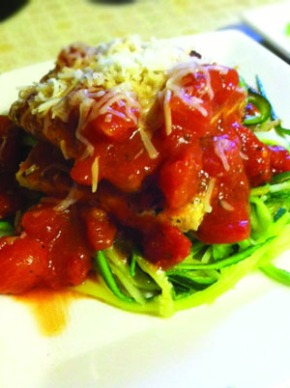
Tofu Parmesan with Zucchini Spaghetti.

Image


Ingredients:

  • 2 medium size zucchini’s
  • 12 oz (4 servings) of organic tofu
  • Marinara, Pasta Sauce of Choice.
  • Shredded Mozzarella or Mozzarella Combo of Choice.
  • Grated Parmesan
  • Dried Parsley
  • Salt & Pepper
  • Panko Crumbs
  • EVOO

Preparation Option 1:

  1. Boil water as you would for pasta.
  2. Heat Sauce in sauce pan on medium until hot and boiling and return to low and cover.
  3. Cut off ends of zucchini. Use a julienne peeler and go from end to end rotating each time to get even julienne slices. Continue all around until you hit the fleshy, seeded center. Discard or you can chop up and add to sauce. Set aside.
  4. Cut Tofu into about  ½ inch slices. Should yield around 4 to 8 servings, depending on thickness.
  5. Prepare a shallow bowl with about ½ cup panko crumbs to ¼ cup of grated parmesan cheese. Add about 2 Tablespoons dried parsley and pepper to taste. Mix. You may need to add more if you run out depending on amount of Tofu. Take Tofu slices and press into crumb mixture on each side. If you need to just press the crumb mixture into tofu slices to get better coverage. Set aside.
  6. Add zucchini spaghetti to water. Stir. Wait about 3 to 4 minutes. Don’t overcook or it will be mushy. Check after 2 minutes or so. You want it al dente. Not crunchy, but not mushy either.
  7. Meanwhile, sauté tofu slices in a pan with about 2 Tablespoons of EVOO on each side, until golden brown.
  8. Plate zucchini pasta immediately after done and drained.
  9. Top with tofu slices. Add sauce. Sprinkle with shredded Mozzarella.

Quick Tip:

You can always prep zucchini the night or morning before and place in an airtight container.

Some of you may not be tofu fans and that’s ok though I urge you to give this recipe a good try before you completely write it off. Even my picky toddler gobbles it right up. No joke. However, you can always at least use the zucchini spaghetti in place of pasta served with whatever edition you choose.

Happy Foodie Friday!

– J


Hi all!

I just came up with this recipe today and tried it out on a friend and she loved it, so….I thought I would share it all with you. Truly a great option for an apple pie replacement at half the calories without compromising on flavor and texture. Lightly sweet, not overpowering and has a chewy and slightly crispness around the edges.

This is a great low-fat, low-cal, healthy, BUT tasty option for those trying to watch calories, don’t want to have to miss out on sweet treats while watching their figure and it’s also diabetic friendly with one minor modification. Instructions are below.

So, here is the recipe. Try it out and tell me what you think. I don’t think I will ever be going back to apple pie after this!

Jamie’s Skinny Apple Pie

Recipe for 2 people

  • Whole wheat tortillas (I prefer Target Archer Farms brand because it’s slightly sweet) – 1 tortilla per person
  • 1 tbsp per person of light cream cheese
  •  small apple per person ( I prefer gala or jonathon but feel free to experiment. I think granny smith might taste not sweet enough, but I could be wrong, just haven’t tried.)
  • Cinnamon
  • 1-2 tsp. of light brown sugar per person ( for diabetics see directions below.)
  • 1/8 c of unsweetened applesauce
  • Cooking Spray
  • Foil


  1. Preheat oven to 325 Degrees.
  2. Skin, Core and Chop up apples
  3. Spray Pan with cooking spray, put on medium heat, and add apples, sprinkle with cinnamon, applesauce and brown sugar. Cook until just tender about 5 minutes.
  4. Spread each tortilla with 1 tbsp of cream cheese per tortilla and sprinkle lightly with cinnamon.
  5. When apples are done cooking, spoon mixture in a thin layer on half the tortilla. Divide evenly amongst 2 tortillas.
  6. Roll up tortilla starting from the half the apple mixture is on in a tight roll all the way across.
  7. Place rolled tortillas on a sheet of aluminum foil and wrap it up around the tortillas so shell isn’t showing.
  8. Place in oven and cook for about 5-6 minutes, enough time to warm and heat through.
  9. Remove from oven, cut in half and serve hot.


Calorie Breakdown per person

Tortillas: 1 per serving/person 130 calories

Light Cream Cheese: 1 Tbsp per person 30 calories

Light Brown Sugar: 1-2 tsp. per person 15 calories per tsp.

Unsweetened Applesauce: 1/8 c per person is about 12 calories

1 small apple about 80 calories per apple

­

= Per person calories are about 282

You are saving around half the calories from having a slice of French apple cream cheese pie which is about 540 calories per slice AND it’s way healthier and a lot less sugar.

*Special Instructions for Diabetics and people who prefer a no sugar option

Follow recipe as is, just do not add brown sugar to apple mixture just use apple sauce and cinnamon